The first post in the series went over the design goals and the logical diagram of the Kubernetes environment. This post will include the necessary steps to PXEBOOT a CoreOS node, install the VMware Tools included version of CoreOS and perform an initial configuration of the CoreOS node with Ignition.
After determining what the Infrastructure-as-Code project would be working to accomplish, I broke the project down into several pieces. The decision was made to start off with learning how CoreOS worked, how to install and configure it in a manner that would allow the deployment of 1, 5, 100 or 1000 nodes — with each node operating in the same way every single time. As familiar as I am with Big Data Extensions and how the management server deploys things with Chef, I decided to go in a different direction. I did not want to use a template VM that is copied over and over again — instead I chose to use a PXEBOOT server for performing the initial installation of CoreOS.
In this post, I will detail how to configure an Ubuntu node to act as the PXEBOOT server, how to perform a CoreOS stateful installation and provide the necessary Ignition files for accomplishing these tasks.
Step 1: Ubuntu 17.10 PXEBOOT Node
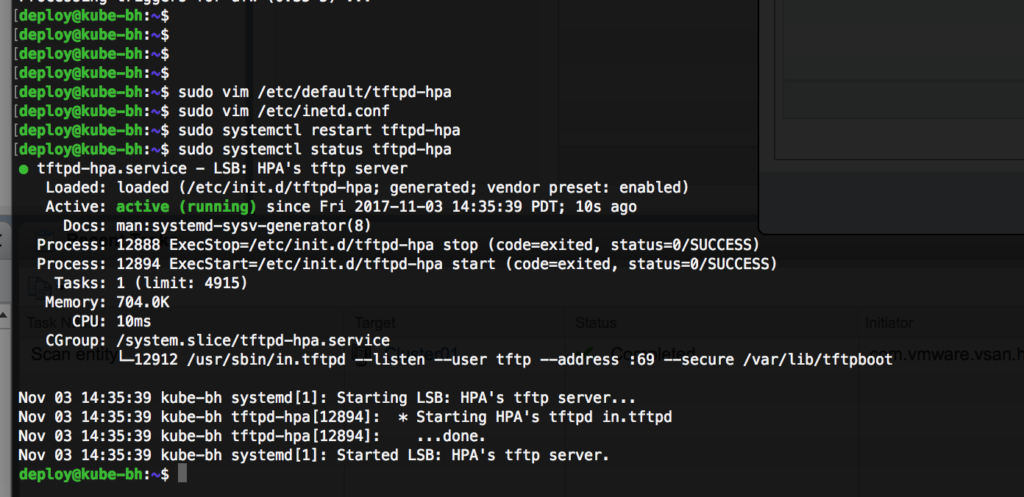
I am using an Ubuntu Server 17.10 virtual machine as my beachhead node where I am running the tftpd and bind9 services for the entire micro-segmented network. It had been a few years since I had to setup a PXEBOOT server and I needed a refresher course when I set out to work on this project. After getting a base install with sshd running on an Ubuntu Server 17.10 node, the following steps were required to configure tftpd-hpa and get the PXE images in place.
Configure a PXEBOOT Linux server:
$ sudo apt-get -y install tftpd-hpa syslinux pxelinux initramfs-tools
$ sudo vim /etc/default/tftpd-hpa

# /etc/default/tftpd-hpa
TFTP_USERNAME="tftp"
TFTP_DIRECTORY="/var/lib/tftpboot"
TFTP_ADDRESS=":69"
TFTP_OPTIONS="--secure"
RUN_DAEMON="yes"
OPTIONS="-l -s /var/lib/tftpboot"

$ sudo mkdir -p /var/lib/tftpboot/pxelinux.cfg
$ sudo /var/lib/tftpboot/pxelinux.cfg

default coreos
prompt 1
timeout 15
display boot.msg

label coreos
  menu default
  kernel coreos_production_pxe.vmlinuz
  initrd coreos_production_pxe_image.cpio.gz
  append coreos.first_boot=1 coreos.config.url=https://s3-us-west-1.amazonaws.com/s3-kube-coreos/pxe-config.ign cloud-config-url=https://s3-us-west-1.amazonaws.com/s3-kube-coreos/cloud-control.sh
Next, it is necessary to download the CoreOS boot files:
$ cd /var/lib/tftpboot
$ sudo wget https://stable.release.core-os.net/amd64-usr/current/coreos_production_pxe.vmlinuz
$ sudo wget https://stable.release.core-os.net/amd64-usr/current/coreos_production_pxe.vmlinuz.sig
$ sudo wget https://stable.release.core-os.net/amd64-usr/current/coreos_production_pxe_image.cpio.gz
$ sudo wget https://stable.release.core-os.net/amd64-usr/current/coreos_production_pxe_image.cpio.gz.sig
$ gpg --verify coreos_production_pxe.vmlinuz.sig
$ gpg --verify coreos_production_pxe_image.cpio.gz.sig
After the CoreOS images are downloaded a restart of the tftpd-hpa service should be all that is required for this step.
Step 2: CoreOS Ignition
CoreOS replaced the previous coreos-cloudinit orchestration with Ignition to provide the orchestration to the operating system. Ignition is designed to run early on in the boot process to allow the user space to be modified prior to executing many of the operation services. Whereas it used to be possible to use a YAML configuration file, Ignition now relies on a JSON to define what actions (partitioning, user creation, file creation, etc) are to occur during the first boot of the system. Creating the JSON file and understanding how systemd interacts with other services was the biggest initial challenge to adopting CoreOS for me.
If you are new to Ignition, I highly suggest reading the following pages:
- https://coreos.com/ignition/docs/latest/what-is-ignition.html
- https://coreos.com/ignition/docs/0.19.0/examples.html
A major challenge I faced was the inconsistent examples available on the Internet. Even using an Ignition file a co-worker provided to me proved to be difficult as it seemingly did not work as expected. Through much trial and error — I must have used up an entire /24 DHCP scope booting test VMs — I was able to get the following two Ignition files working.
The first Ignition file is used during the PXEBOOT process — it configures just enough of the system to perform the stateful installation.
pxe-config.ign (S3 download link)
{
  "ignition": {
    "version": "2.1.0",
    "config": {}
  },
  "storage": {
    "disks": [{
      "device": "/dev/sda",
      "wipeTable": true,
      "partitions": [{
        "label": "ROOT",
        "number": 0,
        "size": 0,
        "start": 0
      }]
    }],
  "filesystems": [{
    "mount": {
      "device": "/dev/sda1",
      "format": "ext4",
      "wipeFilesystem": true,
      "options": [ "-L", "ROOT" ]
     }
   }]
  },
  "systemd": {
     "units": [
       {
         "contents": "[Unit]\nDescription=Set hostname to DHCP FQDN\n\n[Service]\nType=oneshot\nExecStart=/bin/sh -c \"IP=$(ip add show ens192 | awk '/inet/ {print $2}' | cut -d/ -f1 |cut -d. -f4 | head -1) ; sudo hostnamectl set-hostname dhcp-coreos$IP\"\n",
         "enabled": true,
         "name": "set-hostname.service"
       },
       {
         "name": "etcd2.service",
         "enabled": true
       }
     ]
  },
  "networkd": {},
  "passwd": {
    "users": [
      {
        "name": "deploy",
        "sshAuthorizedKeys": [
          "ssh-rsa AAAAB3NzaC1yc2EAAAADAQABAAAEAQCsNebg9k312OhcZlC+JM8daEyT5XpFEb1gnUgEHms+/yft6rlr+Y/BOXC9r/0UR2VB41tpx9B8ZZADHa/I8cZKctRP4idwKWlPJlxqPohVWwgGk9oYyDY4612bO9gYQros9XKDI+IZMc0xOrdm7D7dowzheez77OQeZFKtef0w61LdBTQn4JXAK0DhuldGwvoH7SDkEMk1FH3U45DSljgMOAwbxnr6Gy2embr6qHo15zrGs0OyHFY0YZXCZ1xvhNYuBm8/H06JZnI2qPBGWaRwDNky6MXEtWBUSXjuMsIApGg1nR3hjZbwtN3uH0/VMH/uk7m9mvZXpeu/ktAn70IP/8wq4HjN6pXGY9gsvA2qQULNAI8t5wYuwSa/cm/aWC0Z8rgS6wE04j5i5jLlLpVNHvmBrc3BxKO5AV9k/19TQLSnqbmT9aU7mC8CvguHsy2g5nagqzUwHfpbOS64kYcgISu2LjYdOCRpr9NSzeR3N3l+3yG+QfNE73x9yPifd9aE21Mc3JLIwq+Qo0ZmKrgAu615Y2r7bcEx4wt7SF98rvAC8IZDbMNukSUMR3LPRaQq00OGUxVPdHdxwyLaH4UZ3wb43tFfaDreYAy1SeX1cTHjZ01MAHk2P5mhGPxeUh7LW7w+57GoeFY+aF9SEyrdqpd6DhUC15pJT9Tje/sxTOXUCVWyGgsyxi4ygeZ3ZUb0oUwQ2bnnnzNSXHl+qx722w9saE+LNuZOsnTY26+1TVaYKNczQwGsnjyZdF3VslsQskZ5cld5AeHkPrkrsISjhCAPxP7hOLJRhY2gZk/FqwycZdjARz75MNegidQFNN7MuGaN+F9YinQIHsbReoGHyaKN40tyThs9RwZr7lOPgngjhEddEuaAgre7k4sln9x3PRlNzGX5kPVK+7ccQMWI3DgvMUxkUtV5Di+BNzhtUVN8D8yNjajAf3zk7gEgWdeSNse+GUCwQWt0VCwDIfA1RhfWnyMwukgxqmQe7m5jM4YjLyR7AFe2CeB08jOES9s+N44kWOlrnG3Mf41W2oZ6FbiFcB7+YHGNxnlxK+0QluP17rISgUmnCkEgwGbyisXMrNHTaGfApxd4CertVab0wOvtDNnH4x7ejEiNHiN1crOzpMtnSVnrRi+M+f9w3ChCsirc+3H8tbpSOssI7D3p1eWZlF6z1OSb9pp4+JYwlmAisyz/vZyjC7vtEXsJt3e4JLM1ef62mZTcKHP8xWP3k78hPB5twzSwhMVtZCB/MIT3pg7DA90fbhBkHZIVczgBjN9tOJilHPTuBeuKNzWD0Rhi0CSdzohDYVsO/PKA5ZyEncx83Y9pc4zpcrxgdU2H5NdqkLW9yw7O5gvau7jj [email protected]"
          ],
          "groups": [ "sudo", "docker" ]
     }
   ]
  }
}
During the initial launch of the virtual machine, the PXEBOOT server tells the system to download the Ignition file and a Cloud Config file. The Cloud Config file downloads a shell script that I’ve written to install CoreOS to the /dev/sda disk attached to the VM.
cloud-config-url=https://s3-us-west-1.amazonaws.com/s3-kube-coreos/cloud-control.sh
cloud-control.sh (S3 download link)
#!/bin/bash

wget https://s3-us-west-1.amazonaws.com/s3-kube-coreos/stateful-config.ign
sudo coreos-install -d /dev/sda -i stateful-config.ign -C stable -V current -o vmware_raw
sudo reboot
As you can see, the cloud-control.sh script downloads a second Ignition file from S3 and uses that when it is performing the stateful install of CoreOS. The vmware_raw version of CoreOS includes VMtools within it — this will play an important role as we continue to automate the entire stack.
stateful-config.ign (S3 download link)
{
  "ignition": {
    "version": "2.1.0",
    "config": {}
  },
  "storage": {
    "files": [
      {
        "filesystem": "root",
        "group": {},
        "path": "/etc/motd",
        "user": {},
        "contents": {
          "source": "data:,Stateful%20CoreOS%20Installation.%0A",
          "verification": {}
        }
      },
      {
        "filesystem": "root",
        "group": {},
        "path": "/home/deploy/install_python.sh",
        "user": {},
        "contents": {
          "source":"data:,%23!%2Fusr%2Fbin%2Fbash%0Asudo%20mkdir%20-p%20%2Fopt%2Fbin%0Acd%20%2Fopt%0Asudo%20wget%20http%3A%2F%2F192.168.0.2%3A8080%2FActivePython-2.7.13.2715-linux-x86_64-glibc-2.12-402695.tar.gz%0Asudo%20tar%20-zxf%20ActivePython-2.7.13.2715-linux-x86_64-glibc-2.12-402695.tar.gz%0Asudo%20mv%20ActivePython-2.7.13.2715-linux-x86_64-glibc-2.12-402695%20apy%0Asudo%20%2Fopt%2Fapy%2Finstall.sh%20-I%20%2Fopt%2Fpython%0Asudo%20ln%20-sf%20%2Fopt%2Fpython%2Fbin%2Feasy_install%20%2Fopt%2Fbin%2Feasy_install%0Asudo%20ln%20-sf%20%2Fopt%2Fpython%2Fbin%2Fpip%20%2Fopt%2Fbin%2Fpip%0Asudo%20ln%20-sf%20%2Fopt%2Fpython%2Fbin%2Fpython%20%2Fopt%2Fbin%2Fpython%0Asudo%20ln%20-sf%20%2Fopt%2Fpython%2Fbin%2Fpython%20%2Fopt%2Fbin%2Fpython2%0Asudo%20ln%20-sf%20%2Fopt%2Fpython%2Fbin%2Fvirtualenv%20%2Fopt%2Fbin%2Fvirtualenv%0Asudo%20rm%20-rf%20%2Fopt%2FActivePython-2.7.13.2715-linux-x86_64-glibc-2.12-402695.tar.gz%0A",
          "verification": {},
          "mode": 420
        }
      },
      {
        "filesystem": "root",
        "group": {},
        "path": "/home/deploy/gethost.sh",
        "user": {},
        "contents": {
          "source":"data:,%23!%2Fbin%2Fbash%0AIP%3D%24(%2Fusr%2Fbin%2Fifconfig%20ens192%20%7C%20%2Fusr%2Fbin%2Fawk%20'%2Finet%5Cs%2F%20%7Bprint%20%242%7D'%20%7C%20%2Fusr%2Fbin%2Fxargs%20host%20%7C%20%2Fusr%2Fbin%2Fawk%20'%7Bprint%20%245%7D'%20%7C%20%2Fusr%2Fbin%2Fsed%20s'%2F.%24%2F%2F')%0AHOSTNAME%3D%24IP%0A%2Fusr%2Fbin%2Fsudo%20%2Fusr%2Fbin%2Fhostnamectl%20set-hostname%20%24HOSTNAME%0A",
          "verification": {},
          "mode": 493
        }
      }
    ]
  },
  "systemd": {
    "units": [
      {
        "contents": "[Unit]\nDescription=Use FQDN to set hostname.\nAfter=network-online.target\nWants=network-online.target\n\n[Service]\nType=oneshot\nExecStartPre=/usr/bin/chmod 755 /home/deploy/gethost.sh\nExecStartPre=/usr/bin/chown deploy:deploy /home/deploy/gethost.sh\nExecStart=/home/deploy/gethost.sh\n\n[Install]\nWantedBy=multi-user.target\n",
        "enabled": true,
        "name": "set-hostname.service"
      },
      {
        "contents": "[Unit]\nDescription=Install Python for Ansible.\nAfter=network-online.target\nWants=network-online.target\n\n[Service]\nType=oneshot\nExecStartPre=/usr/bin/chmod 755 /home/deploy/install_python.sh\nExecStartPre=/usr/bin/chown deploy:deploy /home/deploy/install_python.sh\nExecStart=/home/deploy/install_python.sh\n\n[Install]\nWantedBy=multi-user.target\n",
        "enabled": true,
        "name": "env-python.service"
      },
      {
        "name": "etcd2.service",
        "enabled": true
      }
    ]
  },
  "networkd": {},
  "passwd": {
    "users": [
      {
        "name": "deploy",
        "sshAuthorizedKeys": [
          "ssh-rsa AAAAB3NzaC1yc2EAAAADAQABAAAEAQCsNebg9k312OhcZlC+JM8daEyT5XpFEb1gnUgEHms+/yft6rlr+Y/BOXC9r/0UR2VB41tpx9B8ZZADHa/I8cZKctRP4idwKWlPJlxqPohVWwgGk9oYyDY4612bO9gYQros9XKDI+IZMc0xOrdm7D7dowzheez77OQeZFKtef0w61LdBTQn4JXAK0DhuldGwvoH7SDkEMk1FH3U45DSljgMOAwbxnr6Gy2embr6qHo15zrGs0OyHFY0YZXCZ1xvhNYuBm8/H06JZnI2qPBGWaRwDNky6MXEtWBUSXjuMsIApGg1nR3hjZbwtN3uH0/VMH/uk7m9mvZXpeu/ktAn70IP/8wq4HjN6pXGY9gsvA2qQULNAI8t5wYuwSa/cm/aWC0Z8rgS6wE04j5i5jLlLpVNHvmBrc3BxKO5AV9k/19TQLSnqbmT9aU7mC8CvguHsy2g5nagqzUwHfpbOS64kYcgISu2LjYdOCRpr9NSzeR3N3l+3yG+QfNE73x9yPifd9aE21Mc3JLIwq+Qo0ZmKrgAu615Y2r7bcEx4wt7SF98rvAC8IZDbMNukSUMR3LPRaQq00OGUxVPdHdxwyLaH4UZ3wb43tFfaDreYAy1SeX1cTHjZ01MAHk2P5mhGPxeUh7LW7w+57GoeFY+aF9SEyrdqpd6DhUC15pJT9Tje/sxTOXUCVWyGgsyxi4ygeZ3ZUb0oUwQ2bnnnzNSXHl+qx722w9saE+LNuZOsnTY26+1TVaYKNczQwGsnjyZdF3VslsQskZ5cld5AeHkPrkrsISjhCAPxP7hOLJRhY2gZk/FqwycZdjARz75MNegidQFNN7MuGaN+F9YinQIHsbReoGHyaKN40tyThs9RwZr7lOPgngjhEddEuaAgre7k4sln9x3PRlNzGX5kPVK+7ccQMWI3DgvMUxkUtV5Di+BNzhtUVN8D8yNjajAf3zk7gEgWdeSNse+GUCwQWt0VCwDIfA1RhfWnyMwukgxqmQe7m5jM4YjLyR7AFe2CeB08jOES9s+N44kWOlrnG3Mf41W2oZ6FbiFcB7+YHGNxnlxK+0QluP17rISgUmnCkEgwGbyisXMrNHTaGfApxd4CertVab0wOvtDNnH4x7ejEiNHiN1crOzpMtnSVnrRi+M+f9w3ChCsirc+3H8tbpSOssI7D3p1eWZlF6z1OSb9pp4+JYwlmAisyz/vZyjC7vtEXsJt3e4JLM1ef62mZTcKHP8xWP3k78hPB5twzSwhMVtZCB/MIT3pg7DA90fbhBkHZIVczgBjN9tOJilHPTuBeuKNzWD0Rhi0CSdzohDYVsO/PKA5ZyEncx83Y9pc4zpcrxgdU2H5NdqkLW9yw7O5gvau7jj [email protected]"
        ],
        "groups": [ "sudo", "docker" ]
      }
    ]
  }
}
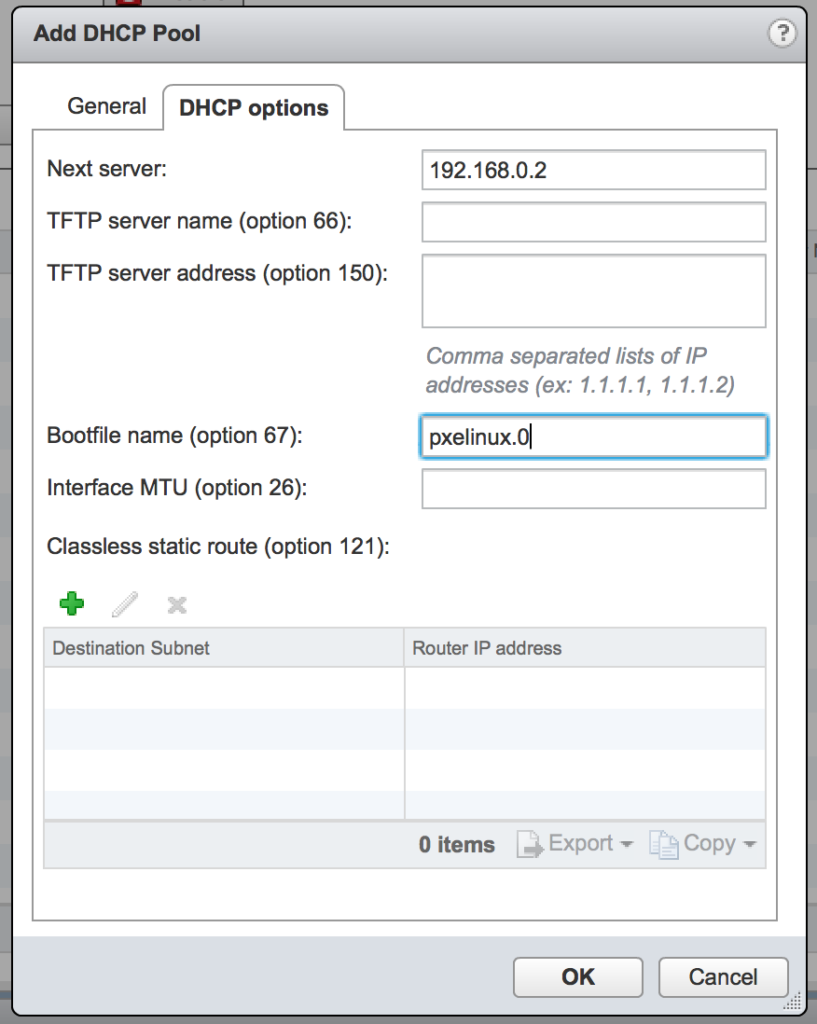
Step 3: Configure DHCP on NSX Edge
The last piece before a virtual machine can be booted will be to configure the NSX Edge needs to have the DHCP services configured and setup to use the Ubuntu server. I plan to automate this piece through Ansible in a future article, for now I will simply show you how it needs to be configured in the UI.
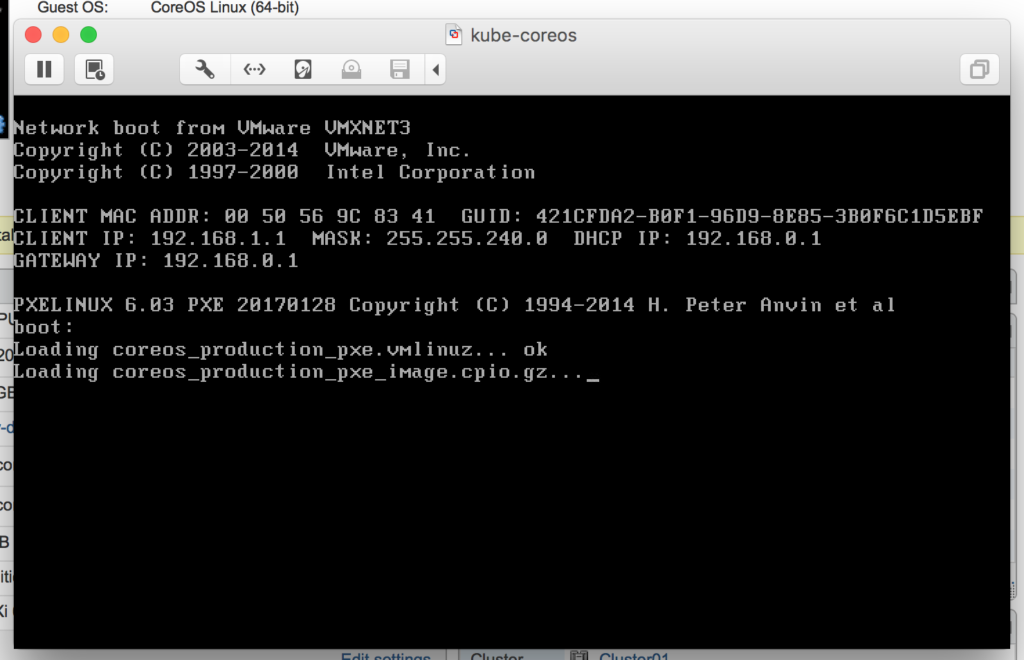
Step 4: Booting a VM
Everything should be in place now to boot the first VM. To be fair, I booted the “first” VM about 150 times as I worked through all of the Ignition iterations to get everything working as I intended. For my lab virtual machines, I am configuring the nodes with the following specifications:
- 2 vCPU
- 8 GB RAM
- 50 GB hard disk
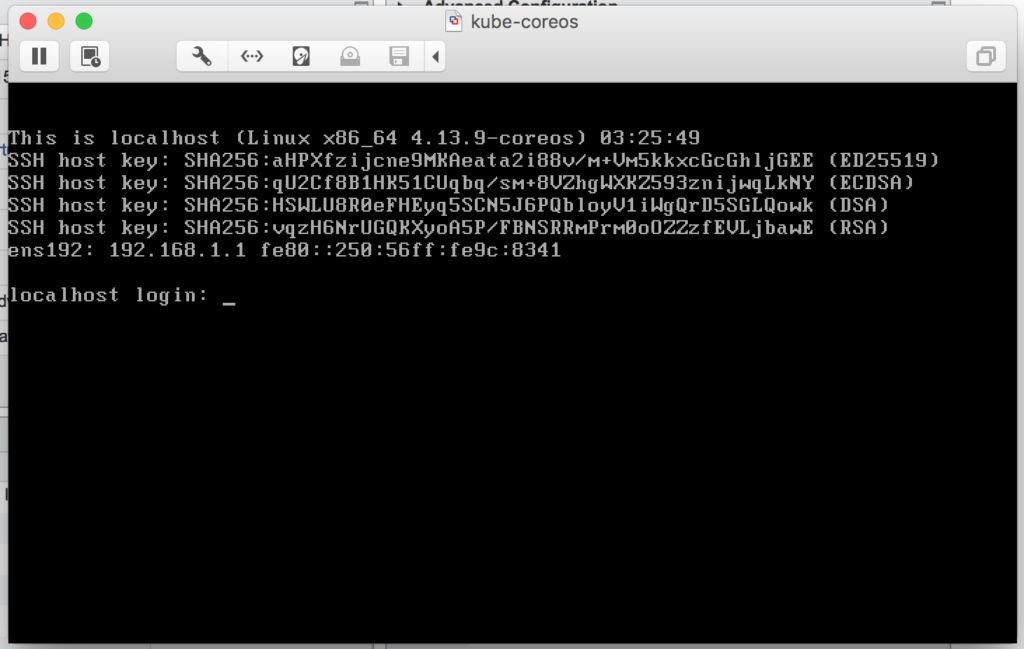
After powering on the VM and watching it go through the boot process, it takes about 5 minutes for it to perform the stateful installation and become available over SSH.
The next post will go through the stateful-config.ign Ignition file in detail, reviewing all the actions it is performing. I hope you are enjoying the series! Find me on Twitter if you have questions or comments.
[Introduction] [Part 1 – Bootstrap CoreOS with Ignition] [Part 2 – Understanding CoreOS Ignition] [Part 3 – Getting started with Ansible]