As I worked through the VCP5-DVC blueprint, the necessity to revisit iSCSI storage configuration and management became a key point of my study efforts. I had not used iSCSI storage before within a VMware vSphere environment, so learning how to tie it all into the infrastructure was totally new to me. In fact, the last time I had used iSCSI storage was with my previous employer 5+ years ago within a customized CentOS OpenVZ environment.
Fortunately, Google did not fail me and there were many resources readily available for teaching me how to implement iSCSI storage within a CentOS Linux virtual machine. From there it was a matter of creating a storage adapter within vCenter and exporting the iSCSI datastores to the environment.
This post will go through the steps to configure the iSCSI storage within a Linux VM, export it to vCenter and add it into the IaaS offering as a VMFS datastore. I found this extremely helpful in my preparation for the exam and in learning how to troubleshoot misconfiguration settings within the iSCSI VM — making mistakes are often the best way to learn!
Note: This is only a guide for creating an iSCSI lab environment, I would not suggest creating an iSCSI environment like this for use within a production environment.
Pre-Step: Configure iSCSI datastore
This guide assumes you already have a CentOS installed virtual machine or physical server that you have the storage on. I am not focusing on performance, but rather the process, so a virtual machine works well here.
- Select the host you have chosen to be the iSCSI target and Edit Settings.
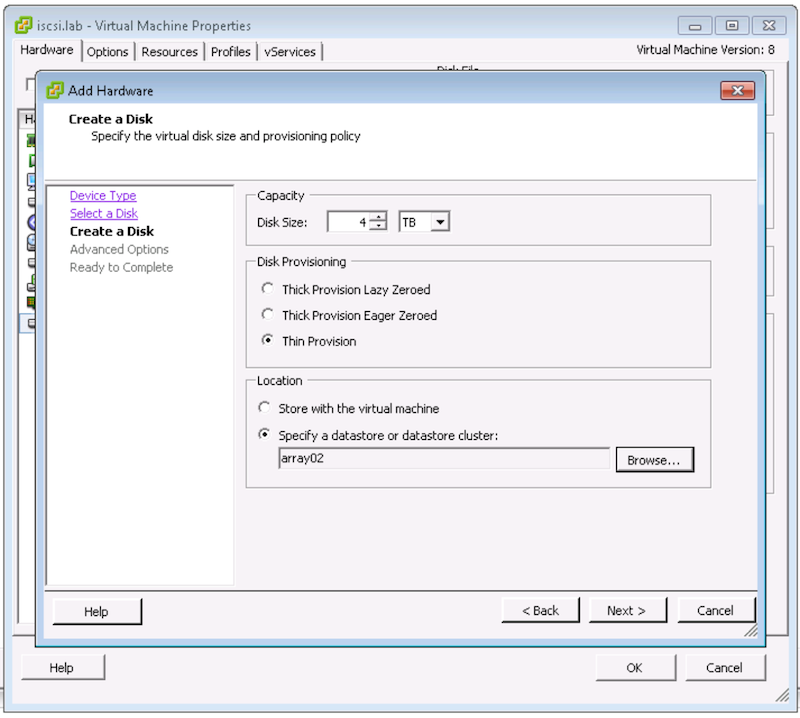 Add the datastore(s) into the VM. For this exercise, I have added 2x4TB datastores which will be exclusively used as iSCSI targets.
Now we are ready to configure the OS to act as the iSCSI target.
Step 1: Configure software iSCSI within CentOS
- We start by adding the necessary package to the OS in order for it to act as an iSCSI initiator.
[root@iscsi iscsi]# yum -y install scsi-target-utils
Loaded plugins: fastestmirror, security
Loading mirror speeds from cached hostfile
 * base: mirror.anl.gov
 * extras: centos.arvixe.com
 * updates: cosmos.cites.illinois.edu
Setting up Install Process
Resolving Dependencies
--> Running transaction check
---> Package scsi-target-utils.x86_64 0:1.0.24-12.el6_5 will be installed
--> Processing Dependency: sg3_utils for package: scsi-target-utils-1.0.24-12.el6_5.x86_64
--> Processing Dependency: perl(Config::General) for package: scsi-target-utils-1.0.24-12.el6_5.x86_64
--> Processing Dependency: librdmacm.so.1(RDMACM_1.0)(64bit) for package: scsi-target-utils-1.0.24-12.el6_5.x86_64
--> Processing Dependency: libibverbs.so.1(IBVERBS_1.1)(64bit) for package: scsi-target-utils-1.0.24-12.el6_5.x86_64
--> Processing Dependency: libibverbs.so.1(IBVERBS_1.0)(64bit) for package: scsi-target-utils-1.0.24-12.el6_5.x86_64
--> Processing Dependency: librdmacm.so.1()(64bit) for package: scsi-target-utils-1.0.24-12.el6_5.x86_64
--> Processing Dependency: libibverbs.so.1()(64bit) for package: scsi-target-utils-1.0.24-12.el6_5.x86_64
--> Running transaction check
---> Package libibverbs.x86_64 0:1.1.7-1.el6 will be installed
---> Package librdmacm.x86_64 0:1.0.17-1.el6 will be installed
---> Package perl-Config-General.noarch 0:2.52-1.el6 will be installed
---> Package sg3_utils.x86_64 0:1.28-5.el6 will be installed
--> Finished Dependency Resolution

Dependencies Resolved

==========================================================================================
 Package Arch Version Repository Size
==========================================================================================
Installing:
 scsi-target-utils x86_64 1.0.24-12.el6_5 updates 175 k
Installing for dependencies:
 libibverbs x86_64 1.1.7-1.el6 base 45 k
 librdmacm x86_64 1.0.17-1.el6 base 56 k
 perl-Config-General noarch 2.52-1.el6 base 72 k
 sg3_utils x86_64 1.28-5.el6 base 471 k

Transaction Summary
==========================================================================================
Install 5 Package(s)

Total download size: 819 k
Installed size: 2.0 M
Downloading Packages:
(1/5): libibverbs-1.1.7-1.el6.x86_64.rpm | 45 kB 00:00
(2/5): librdmacm-1.0.17-1.el6.x86_64.rpm | 56 kB 00:00
(3/5): perl-Config-General-2.52-1.el6.noarch.rpm | 72 kB 00:00
(4/5): scsi-target-utils-1.0.24-12.el6_5.x86_64.rpm | 175 kB 00:00
(5/5): sg3_utils-1.28-5.el6.x86_64.rpm | 471 kB 00:00
------------------------------------------------------------------------------------------
Total 640 kB/s | 819 kB 00:01
Running rpm_check_debug
Running Transaction Test
Transaction Test Succeeded
Running Transaction
 Installing : libibverbs-1.1.7-1.el6.x86_64 1/5
 Installing : librdmacm-1.0.17-1.el6.x86_64 2/5
 Installing : perl-Config-General-2.52-1.el6.noarch 3/5
 Installing : sg3_utils-1.28-5.el6.x86_64 4/5
 Installing : scsi-target-utils-1.0.24-12.el6_5.x86_64 5/5
 Verifying : librdmacm-1.0.17-1.el6.x86_64 1/5
 Verifying : sg3_utils-1.28-5.el6.x86_64 2/5
 Verifying : perl-Config-General-2.52-1.el6.noarch 3/5
 Verifying : libibverbs-1.1.7-1.el6.x86_64 4/5
 Verifying : scsi-target-utils-1.0.24-12.el6_5.x86_64 5/5

Installed:
 scsi-target-utils.x86_64 0:1.0.24-12.el6_5

Dependency Installed:
 libibverbs.x86_64 0:1.1.7-1.el6 librdmacm.x86_64 0:1.0.17-1.el6
 perl-Config-General.noarch 0:2.52-1.el6 sg3_utils.x86_64 0:1.28-5.el6

Complete!
[root@iscsi iscsi]#
- Creating the iSCSI targets in /etc/tgt/targets.conf
 43 # Similar, but we use "direct-store" instead of "backing-store".
 44 # "direct-store" reads drive parameters with sg_inq command and sets them to
 45 # the target.
 46 # Parameters fatched with sg_inq are:
 47 # - Vendor identification
 48 # - Product identification
 49 # - Product revision level
 50 # - Unit serial number (if present)
 51 # We also specify "incominguser".
 52
 53 <target iqn.2014-09.lab.example:server.target1>
 54 backing-store /dev/sdb
 55 backing-store /dev/sdc
 56 initiator-address 172.16.0.0/16
 57 </target>
- Start the tgtd service and set the service to restart upon reboot:
[root@iscsi iscsi]# service tgtd restart
Stopping SCSI target daemon: [ OK ]
Starting SCSI target daemon: [ OK ]
[root@iscsi iscsi]# chkconfig tgtd on
[root@iscsi iscsi]# chkconfig --list tgtd
tgtd 0:off 1:off 2:on 3:on 4:on 5:on 6:off
- Open the firewall to allow iSCSI traffic:
[root@iscsi iscsi]# vim /etc/sysconfig/iptables
-A INPUT -m state --state NEW -m tcp -p tcp --dport 3260 -j ACCEPT
- Check that the targets are appearing through iSCSI:
[root@iscsi iscsi]# tgtadm --mode target --op show
Target 1: iqn.2014-09.lab.example:server.target1
 System information:
 Driver: iscsi
 State: ready
 I_T nexus information:
 LUN information:
 LUN: 0
 Type: controller
 SCSI ID: IET 00010000
 SCSI SN: beaf10
 Size: 0 MB, Block size: 1
 Online: Yes
 Removable media: No
 Prevent removal: No
 Readonly: No
 Backing store type: null
 Backing store path: None
 Backing store flags:
 LUN: 1
 Type: disk
 SCSI ID: IET 00010001
 SCSI SN: beaf11
 Size: 4398047 MB, Block size: 512
 Online: Yes
 Removable media: No
 Prevent removal: No
 Readonly: No
 Backing store type: rdwr
 Backing store path: /dev/sdb
 Backing store flags:
 LUN: 2
 Type: disk
 SCSI ID: IET 00010002
 SCSI SN: beaf12
 Size: 4398047 MB, Block size: 512
 Online: Yes
 Removable media: No
 Prevent removal: No
 Readonly: No
 Backing store type: rdwr
 Backing store path: /dev/sdc
 Backing store flags:
 Account information:
 ACL information:
 172.16.0.0/16
- Now you have a working iSCSI target and exported LUNs for consumption within your vSphere environment.
Step 2: Adding iSCSI Storage Adapter to vCenter
- Add the Software iSCSI Storage Adapter by choosing a Host within your vSphere environment. Choose the Configuration tab, and Storage Adapters from the left-side of the screen.

- Once the iSCSI Storage Adapter is listed within the top half of the window, select it and then edit the Properties via the link on the bottom half of the screen.
- Add the VMKernel interface to the adapter.


- Add the IP address of the iSCSI initiator for Dynamic Discovery.
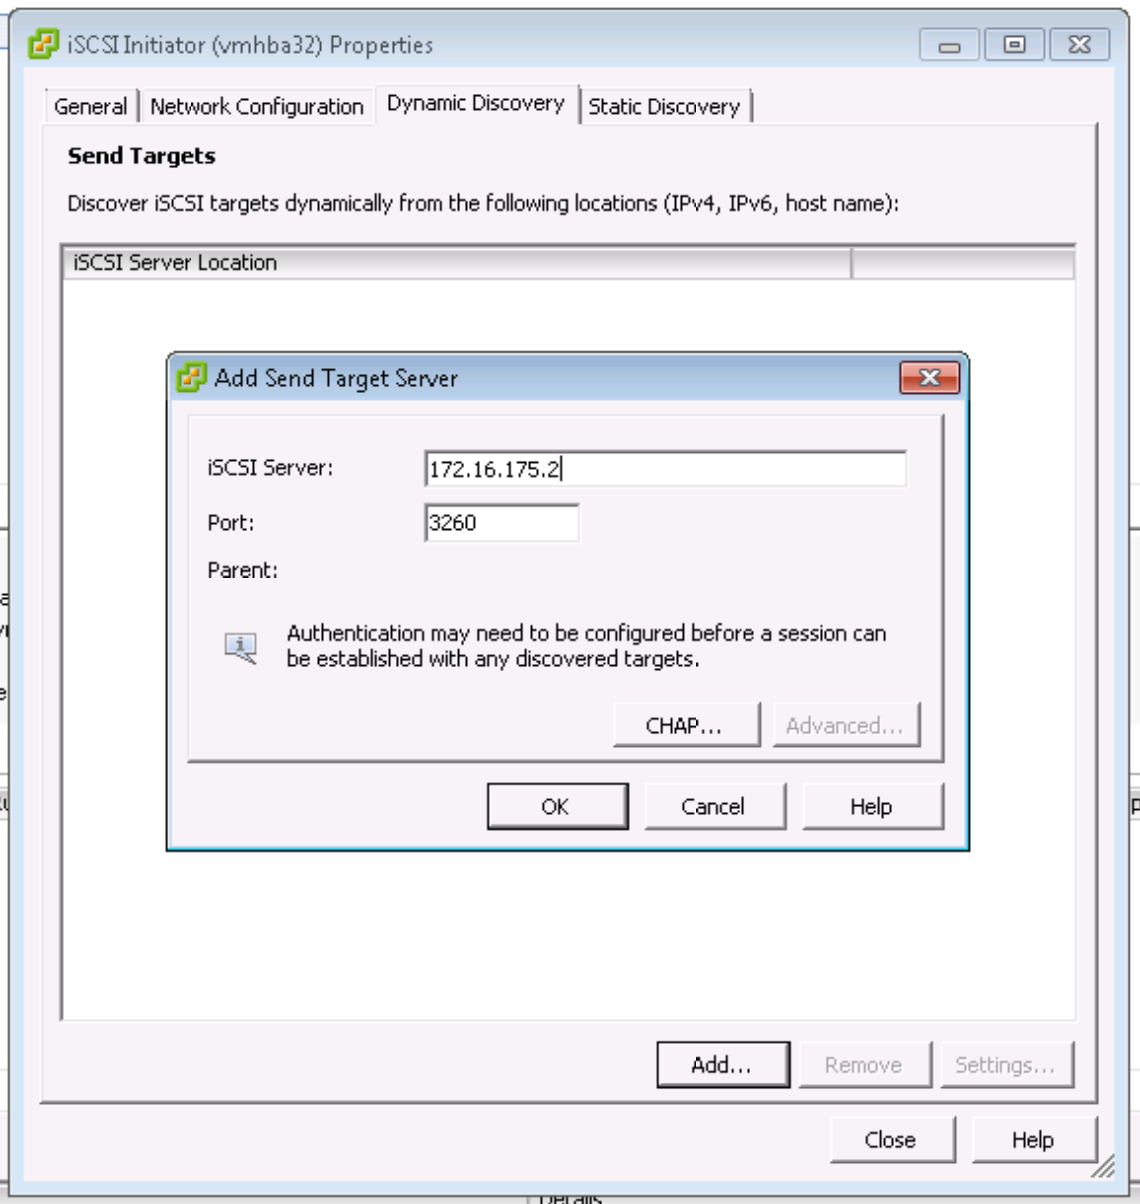
- If necessary, update the CHAP settings for the iSCSI initiator. If you are following along the steps included here, you will not have to add any CHAP settings to connect to the iSCSI Initiator.
- Rinse and repeat for each host within the vSphere environment that you need to configure access to the iSCSI initiator for.
Step 3: Verify IP Storage Network Settings
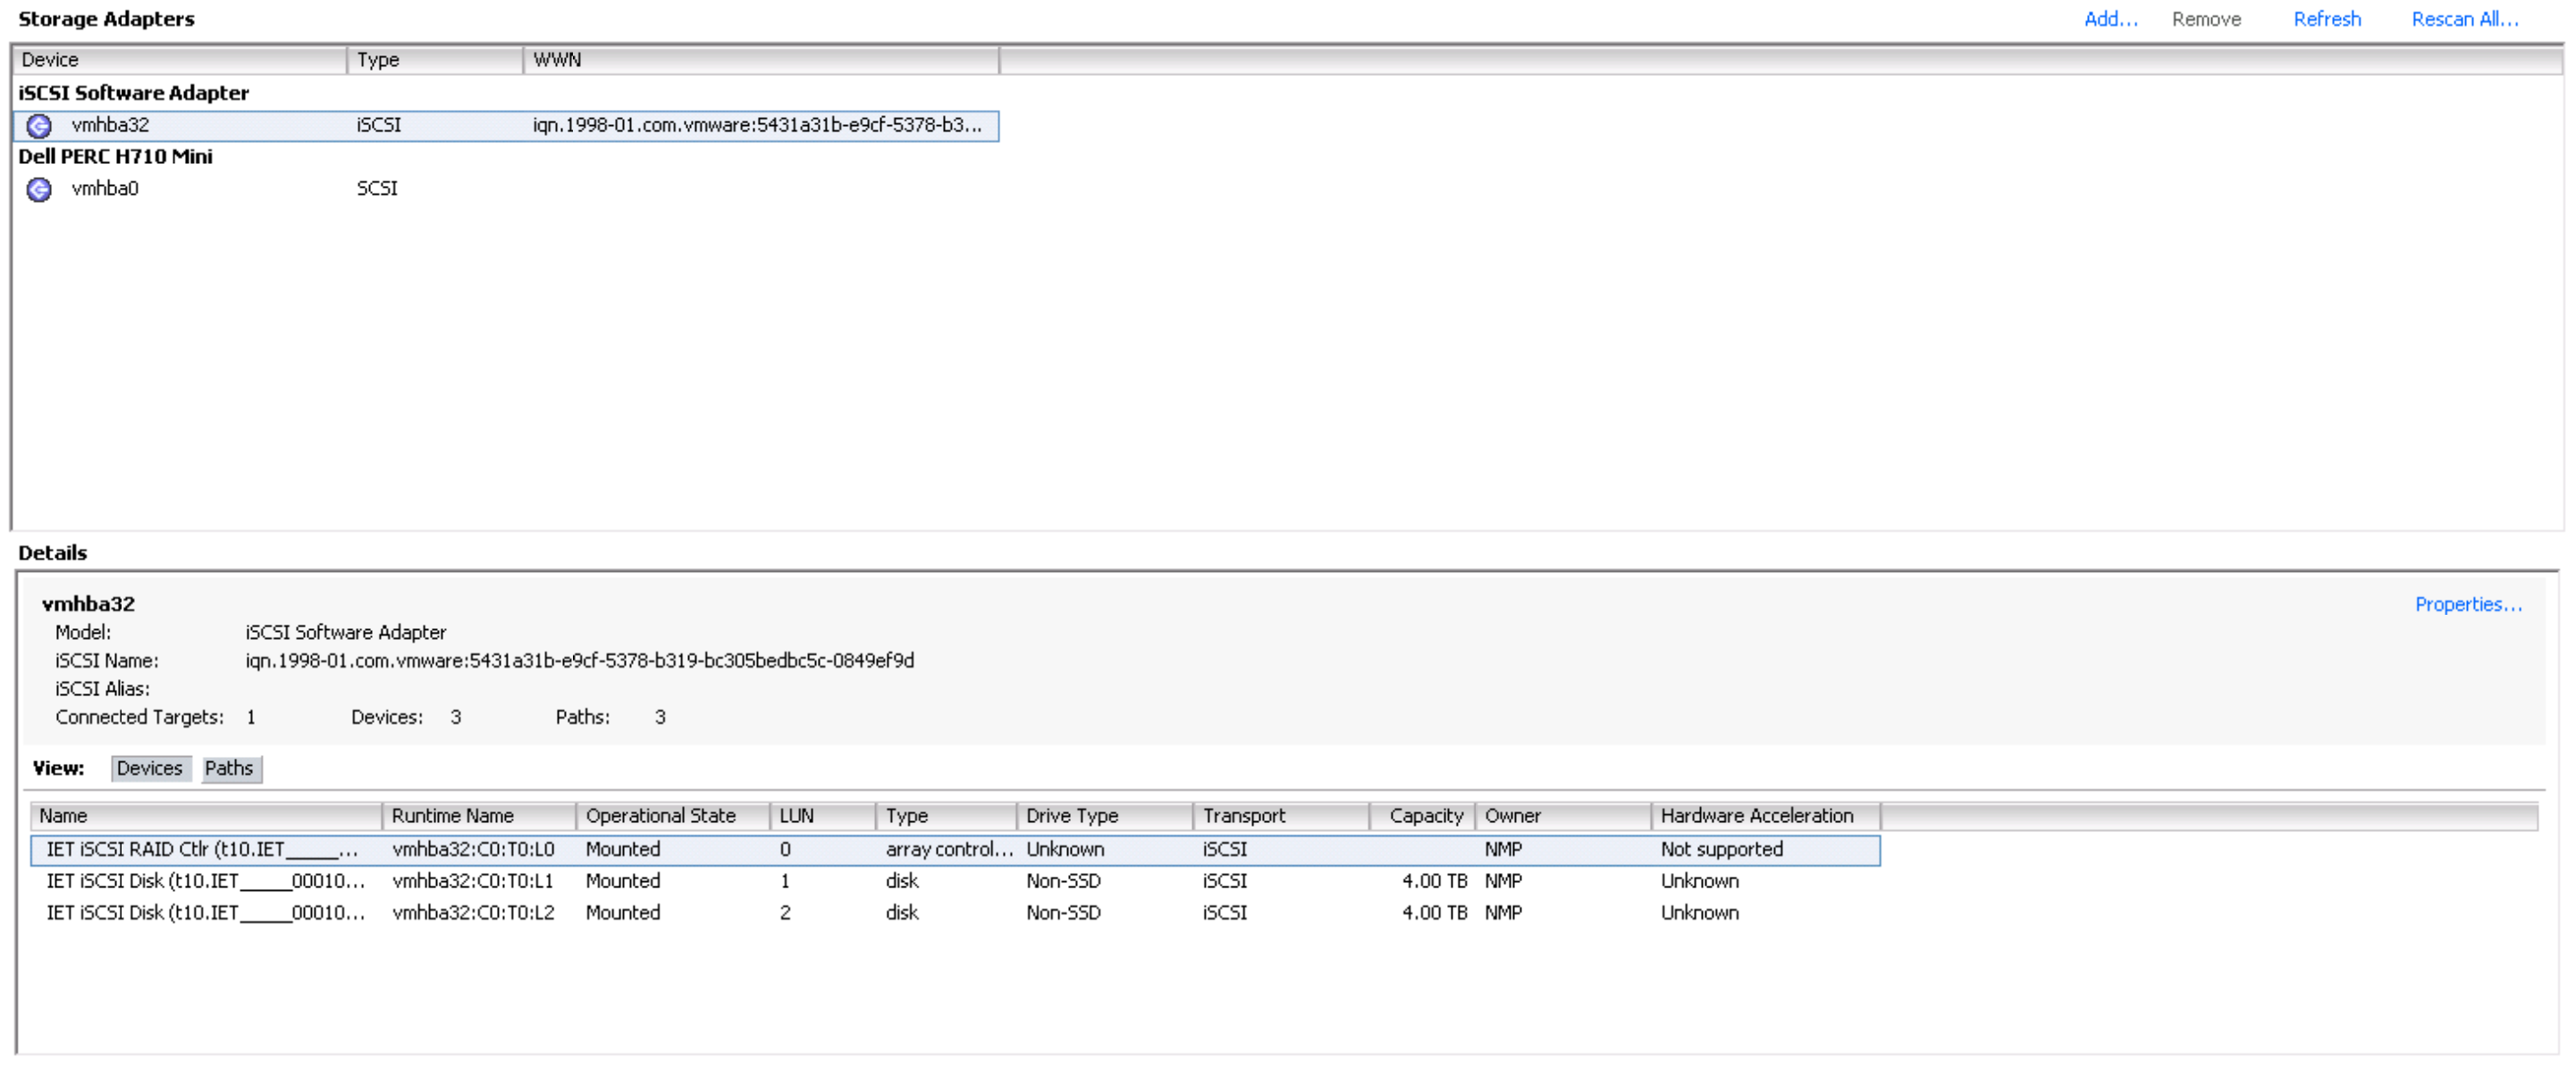
- If you have properly configured both the iSCSI Initiator and the Storage Adapter(s), then you will see the window populate itself with the number of targets you configured:
Step 4: Adding the iSCSI Datastores
- The next step will be to format the iSCSI LUNs as VMFS datastores for the vSphere environment to consume.
- Select any of the hosts where you configured the iSCSI Storage Adapter. Go to Configuration -> Storage -> Add
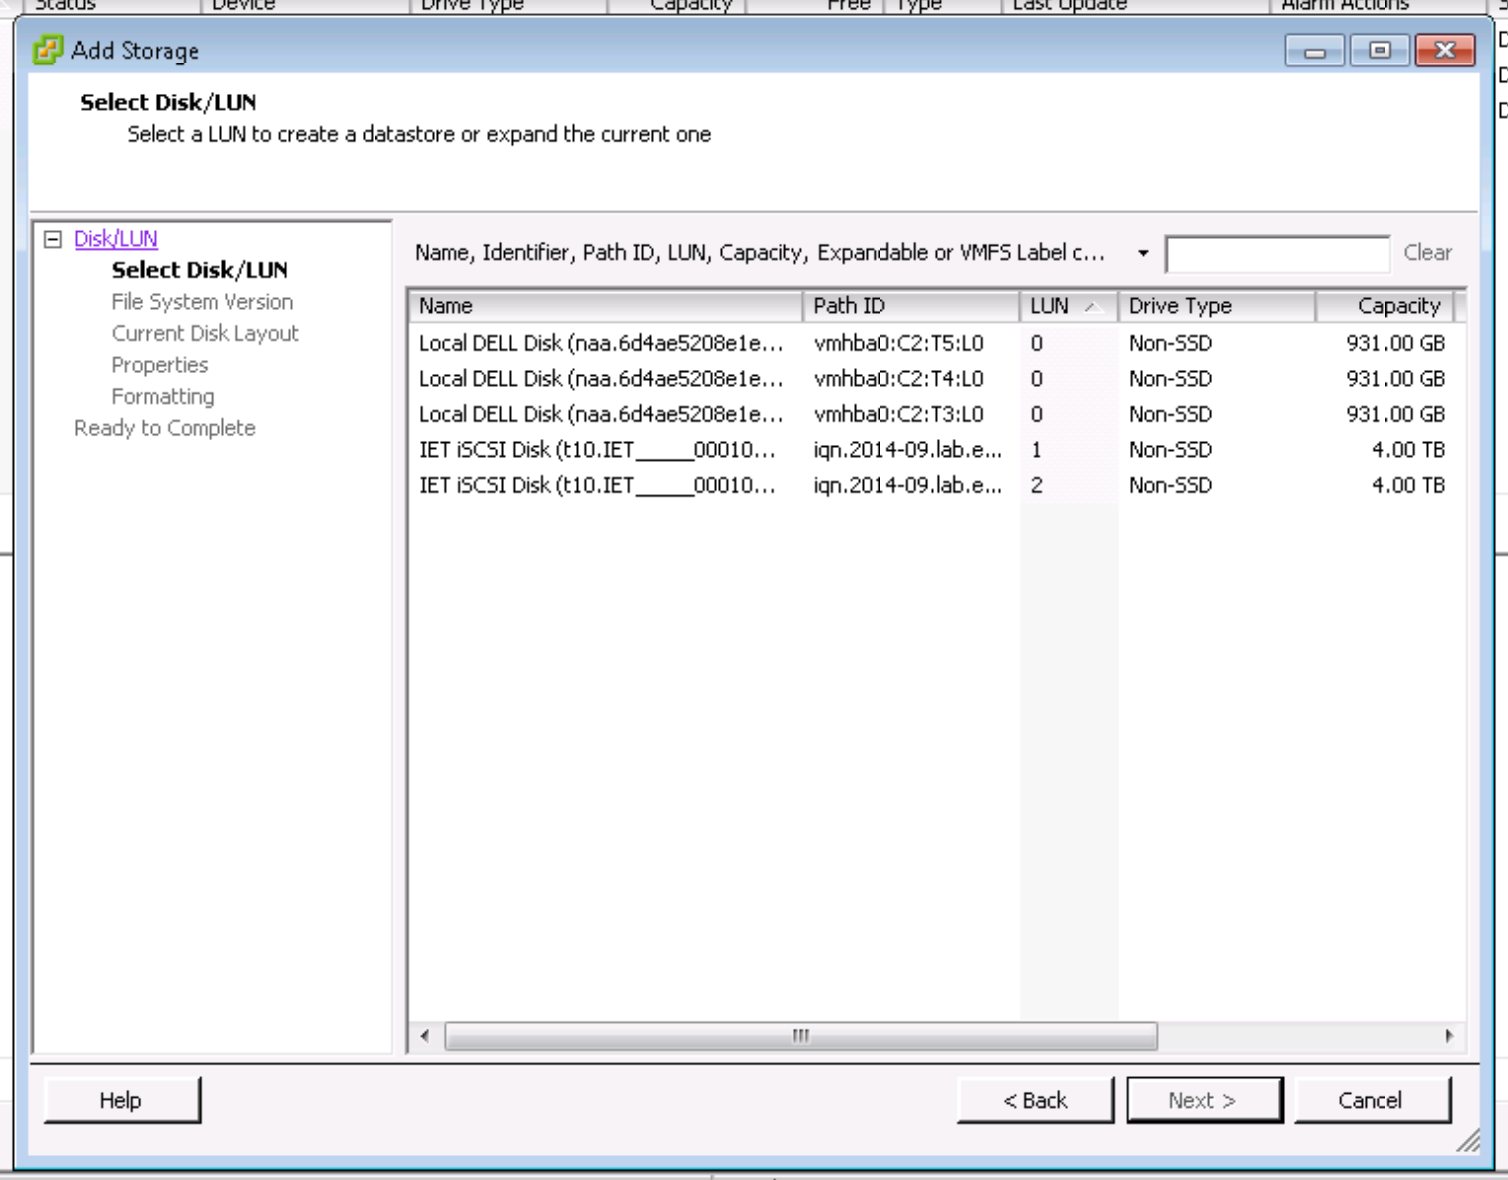
- Format the VMFS datastore using VMFS-5 and allow it to use the maximum capacity available (VMware best practice).
- Repeat for any additional LUNs you created on the iSCSI Initiator.
Step 5: Consuming iSCSI Storage
- You can choose to create a Datastore Cluster that SDRS can manage or consume the datastores individually when you are provisioning virtual machines.
- After creating these shared datastores, you will be able to create an HA and DRS cluster that will not complain about the number of datastore heartbeats.
Obviously the post does not directly relate to Hadoop or virtualizing Hadoop, however understanding the different storage technologies are important for any VMware administrator. If nothing else, going through the process of writing the post has helped me to better understand the iSCSI storage topics that are covered within the VCP5-DCV exam. Hopefully, it was helpful to you as well.