
The previous post introduced the Ignition file that is being used to configure the CoreOS nodes that will eventually be used for running Kubernetes. The Ignition file is a JSON formatted flat-file that needs to include certain information and is particularly sensitive when improperly written. In an effort to help users of Ignition, the CoreOS team have provided a Config Validator and Config Transpiler binary for taking a YAML coreos-cloudinit file and converting it into the JSON format.
This post will review how to use the Config Transpiler to generate a valid JSON file for use by Ignition. After demonstrating its use, I will cover the stateful-config.ign Ignition file being used to configure the CoreOS nodes within the environment.
Step 1: CoreOS Config Transpiler
The CoreOS Config Transpiler is delivered as a binary that can be downloaded to a local system and used to generate a working JSON file for Ignition. After downloading the binary to my Mac OS laptop, I began by writing one section at a time for the stateful-ignition.ign file and then running it through the Config Validator to be it had correct syntax. Generally, when working on a project of this magnitude, I will write small pieces of code and test them before moving onto the next part. This helps me when there are issues, as the Config Validator is not the most verbose tool when there is a misconfiguration. By building small blocks of code, it allows me to build the larger picture slowly and have confidence in the parts that are working.
One piece, which will be covered in greater detail later in the post, was to install Python on CoreOS. For that portion, I decided to have Ignition write a script file to the local filesystem when it boots. To accomplish this, I built the following YAML file:
storage:
  files:
    - path: /home/deploy/install-python.sh
      filesystem: root
      mode: 0644
      contents:
        inline: |
          #!/usr/bin/bash
          sudo mkdir -p /opt/bin
          cd /opt
          sudo wget http://192.168.0.2:8080/ActivePython-2.7.13.2715-linux-x86_64-glibc-2.12-402695.tar.gz
          sudo tar -zxf ActivePython-2.7.13.2715-linux-x86_64-glibc-2.12-402695.tar.gz
          sudo mv ActivePython-2.7.13.2715-linux-x86_64-glibc-2.12-402695 apy
          sudo /opt/apy/install.sh -I /opt/python
          sudo ln -sf /opt/python/bin/easy_install /opt/bin/easy_install
          sudo ln -sf /opt/python/bin/pip /opt/bin/pip
          sudo ln -sf /opt/python/bin/python /opt/bin/python
          sudo ln -sf /opt/python/bin/python /opt/bin/python2
          sudo ln -sf /opt/python/bin/virtualenv /opt/bin/virtualenv
          sudo rm -rf /opt/ActivePython-2.7.13.2715-linux-x86_64-glibc-2.12-402695.tar.gz
Once the YAML file was written, I used the CoreOS Config Transpiler to generate the JSON output. The screenshot below shows how to run the binary to produce the JSON output, which is written to the terminal.
![]()
From there, you can copy the entire output into an Ignition JSON file, or copy-and-paste just the bits that are needed to be added to an existing Ignition JSON file.
You’ve likely noticed there are lots of special characters in the JSON output that are necessary to write the script that will install Python, as described by the YAML file. In addition to that, the output is also one big blob of text — it does not have whitespace formatting, so you’ll need to decide how you want to format your own Ignition file. I personally prefer to take the time to properly format it in a reader-friendly way, as can be seen in the stateful-config.ign file.
Step 2: Understanding the PXEBOOT CoreOS Ignition File
pxeboot-config.ign (S3 download link)
The Ignition file can include a great number of configuration items within in. The Ignition specification includes sections for networking, storage, filesystems, systemd drop-ins and users. The pxeboot-config.ign Ignition file is much smaller compared to the one used when the stateful installation of CoreOS is performed. There is one section I want to highlight independently since it is crucial for it to be in place before the installation can begin.
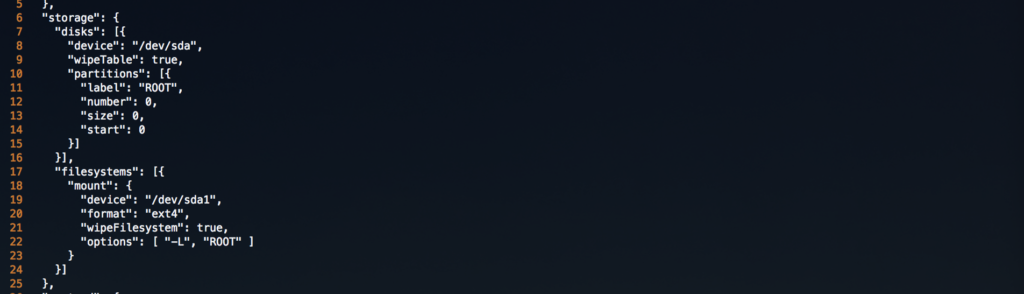
The storage section includes a portion where fdisk is used to create a partition table on the local disk within the CoreOS virtual machine. The code included in this file will work regardless of what size disk is attached to the virtual machine. Right now I am creating a 50Gb disk on my vSAN datastore, however if I change the VM specification later to be larger or smaller, this bit of code will continue to work without modification.
The final part of the storage section then formats the partition using ext4 as the filesystem format. Ignition supports other filesystem types, such as xfs, if you choose to use a different format.
Step 3: Understanding the Stateful CoreOS Ignition File
stateful-config.ign (S3 download link)
Now we will go through each section of code included in the stateful-config.ign file I am using when the stateful installation of CoreOS is performed on one of the deployed nodes. At a minimum, an Ignition file should include at least one user, with an associated SSH key to allow for remote logins to be successful.
There are many examples available from the CoreOS site itself and these were used as reference points when I was building this Ignition file.
Now I will go through each section and describe what actions will be performed when the file is run.

Lines 1-5 define the Ignition version that is to be used — like an OpenStack Heat template, the version will unlock certain features contained in the specification.

The storage section of the Ignition file is where local files can be created (shell scripts, flat files, etc) and where storage devices are formatted. Lines 7-17 define the first file that needs to be created on the local filesystem. The file itself — /etc/motd — is a simple flat file that I wanted to write so that I would know the stateful installation had been performed on the local node. The contents section requires special formatting and this is where the Config Transpiler is helpful. As shown above, a YAML file can be created and the Config Transpiler used to convert it into the correctly formatted JSON code. The YAML file snippet looked like:
storage:
  files:
  - path: /etc/motd
    filesystem: root
    mode: 0644
    contents:
      inline: |
        Stateful CoreOS Installation.
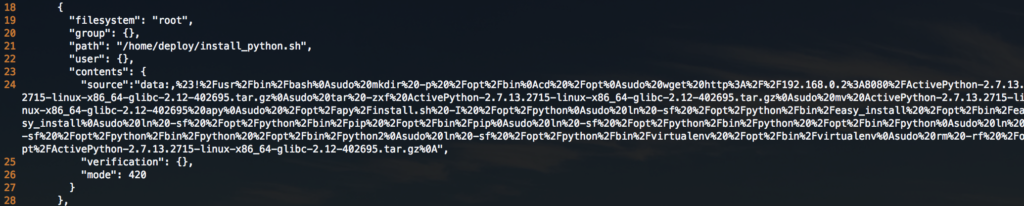
Lines 18-28 create the /home/deploy/install_python.sh shell script that will be used later to actually perform the installation. Remember, the storage section in the Ignition file is not executing any files, it is merely creating them.

Lines 29-41 are now defining another shell script, /home/deploy/gethost.sh, that will be used to assign the FQDN as the hostname of the CoreOS node. This is an important piece since each node will be receiving a DHCP address and as we get further into the automation/orchestration with Ansible, it will be necessary to know exactly which FQDNs exist within the environment.
Line 41 closes off the storage section of the Ignition file. The next section is for systemd units and drop-ins.

Line 42 tells Ignition we are now going to be providing definitions we expect systemd to use during the boot process. This is where Ignition shows some of its robustness — it allows us to create systemd units early enough in the boot process to affect how the system will run when it is brought online fully.
Lines 44-48 define the first systemd unit. Using the /home/deploy/gethost.sh shell script that was defined in the storage section, the Ignition file creates the /etc/systemd/system/set-hostname.service file that will be run during the boot process. The formatting of the contents section here is less severe than the contents section inside a files unit (above). Here we can simply type the characters, including spaces and use the familiar ‘\n’ syntax for newlines.
As you can see the unit above creates the /etc/systemd/system/set-hostname.service file with the following contents:
[Unit]
Description=Use FQDN to set hostname.
After=network-online.target
Wants=network-online.target

[Service]
Type=oneshot
ExecStartPre=/usr/bin/chmod 755 /home/deploy/gethost.sh
ExecStartPre=/usr/bin/chown deploy:deploy /home/deploy/gethost.sh
ExecStart=/home/deploy/gethost.sh

[Install]
WantedBy=multi-user.target

Lines 49-53 take the Python installation script Ignition created and creates a systemd unit for it as well. I confess that this may not be the most ideal method for installing Python, but it works.
The /etc/systemd/system/env-python.service file is created with the following contents:
[Unit]
Description=Install Python for Ansible.
After=network-online.target
Wants=network-online.target

[Service]
Type=oneshot
ExecStartPre=/usr/bin/chmod 755 /home/deploy/install_python.sh
ExecStartPre=/usr/bin/chown deploy:deploy /home/deploy/install_python.sh
ExecStart=/home/deploy/install_python.sh

[Install]
WantedBy=multi-user.target
There is a systemd caveat I want to go over that were instrumental is being able to deliver a functional Ignition file. As I worked through setting the hostname — which should be a relatively easy task — I ran into all sorts of issues. After working through the script, adding debugging messages to the shell script, I was able to determine the systemd unit was being run before the network was fully online — resulting in the scripts inability to successfully query a DNS server to resolve the FQDN. After reading through more blog posts and GitHub pages, I came across the syntax for making sure my systemd services were not being executed until after the network was fully online.
The two key lines here are:
After=network-online.target
Wants=network-online.target
This instructs systemd to not execute this unit until after the network is confirmed to be online. There is another systemd target server — network.target — but it does not guarantee the network is actually fully online. Instead the network.target unit is released after the interface is configured, not necessarily after all of the networking components are fully operational. Using the network-online.target unit ensured the two shell scripts I needed systemd to execute were able to leverage the functioning network.

Lines 54-59 define the last systemd unit in my Ignition file, which tells CoreOS to start the etcd2 service. The configuration of etcd2 will be performed by Ansible and covered in a later post.
 The final portion of the Ignition file defines users the CoreOS system should have when it is fully configured. In the file I have configured a single user, deploy, and assigned an SSH key that can be used to log into the CoreOS node. The code also defines the user to be part of the sudo and the docker groups, which are predefined in the operating system.
Feel free to reach out over Twitter if you have any questions or comments.
[Introduction] [Part 1 – Bootstrap CoreOS with Ignition] [Part 2 – Understanding CoreOS Ignition] [Part 3 – Getting started with Ansible]